Gif Collection
Gifs add an exciting element to any project and have been one of my favorite forms of design to experiment with. Designing for motion is very different from static work but thats what makes it fun! While most of my gifs were made for personal enjoyment, I made two of them for Quinnipiac University to use on their social media and website. View the LGBTQ+ History Month case study here and the Native American Heritage Month case study here.


Ideation & Exploration
I got a lot of inspiration for gifs from Pinterest. I also challenged myself to transform static ideas from my sketchbook into exciting motion graphics. I’ve used Photoshop timeline, Procreate, and Aftereffects for different gifs depending on what my final goal for the gif is.
Love Note
The first gif I made was of hearts bursting from an envelope. I used Photoshop timeline and drew out each frame. The concept isn’t very complex but the process was immensely helpful in learning about how gifs work and the principles of motion graphics.
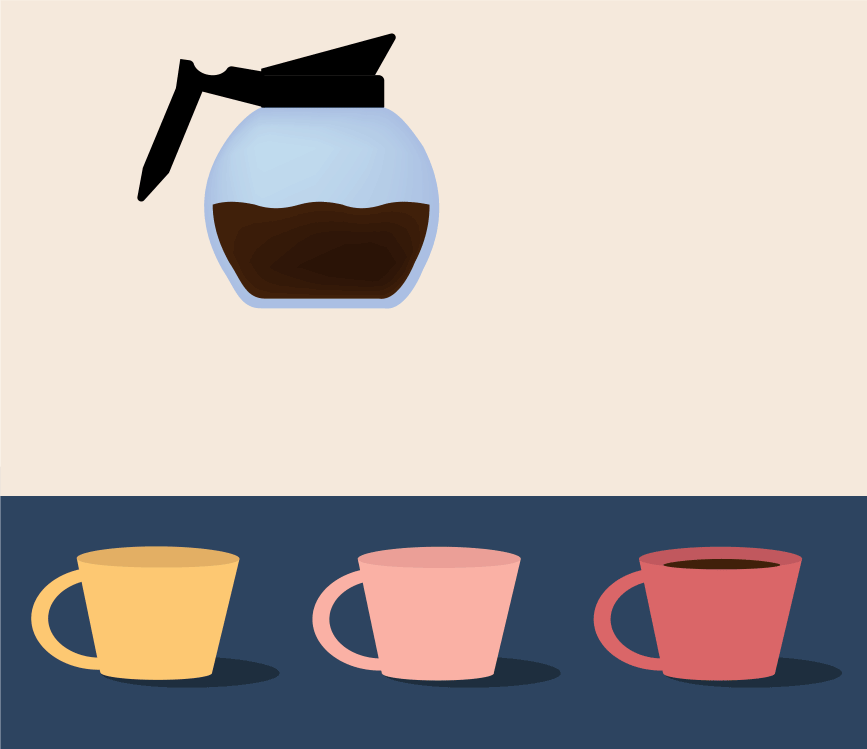
Endless Coffee
The next gif I attempted was coffee pouring from a pot into cups on a conveyer belt. This idea was more applicable to the gif format than the envelope because it can run in an endless loop. I made the components for this gif in Illustrator and then use Photoshop timeline to add motion.
The first attempt at this project had many flaws including the coffee not staying in the cup after it was poured and poor color choices. There were also fewer frames which made the movement very disjointed and abrupt. When I revised it, I added more frames so it would appear more smooth and adjusted the colors to a more pleasing palette.

First attempt

Final gif
Windshield Wipers
This gif was inspired by a word of the day journal prompt. The word was "encumber," and as someone who wears glasses, this was the first thing that came to mind. It was initially just a sketch (seen below) but I thought it would be fun to animate it!
To do so, I made the components in Illustrator and then brought each layer into Photoshop. I used the timeline to make frames from layers, made a few small adjustments, and then the gif was complete.
Let’s Be Friends
To make this gif, I put my hand lettering and Procreate skills to the test. This is one of the first things I made using Procreate and it was immensely helpful in learning the program. The process was very similar to using Photoshop timeline because it uses layers as frames. I wanted to add a little motion and try the trend of letters or words that “shake” rather than use dynamic motion. To do this, I traced multiple layers over the original so that each was slightly different. Putting the layers together into a gif creates a unique effect with very subtle motion.

Experimental landing page

Final landing page
Landing Page Animation
I designed the animation for the landing page of my portfolio site to draw in the audience (if you’re reading this, it worked) and quickly show that I am multifaceted. I began with an experimental gif made in Procreate. While I liked the general idea, it was too busy and jittery for a landing page. It also did not use my branding.
After rethinking the design, I decided that I wanted to use my name and have the text be part of the web page rather than the gif for accessibility purposes. I sketched it out and then began making it in Illustrator. Once each line was in place and on a separate layer, I brought the file into AfterEffects and used trim paths to bring it to life.
Results
These gifs have helped me gain an understand of the principles of motion graphics and opened opportunities for other projects like the LGBTQ+ History Month and the Native American Heritage Month graphics I made for Quinnipiac University.